Spaces and tabs might be the quickest way to indent a paragraph in Word, but you might be sorry. Instead, use built-in indents to avoid random spaces and tabs rearranging your content unexpectedly.

Image: rangizzz/Shutterstock
You know what people say about the right way: there are two ways; your way and my way. This is certainly true with a lot of Microsoft Word tasks. In a simple document, you can be a bit lackadaisical about how you go about things, but longer documents aren't so forgiving. Using tabs and spaces for indents is a good example; they can have harsh repercussions that are hard to troubleshoot. In this article, I'll show you how to use built-in indents instead.
SEE: 83 Excel tips every user should master (TechRepublic)
I'm using Microsoft 365 on a Windows 10 64-bit system, but you can use earlier versions. Word Online will support built-in indents. There's no demonstration file; you won't need one.
The easy way: tabs and spaces
Simply put, an indent is empty space between two elements. Sometimes users use spaces or tabs to create that space. For instance, in a quick one-off document, you might use spaces or tabs to indent the first line of each paragraph. The truth is, you wouldn't be wrong to do so because in this case, those spaces or tabs will do little to no harm.
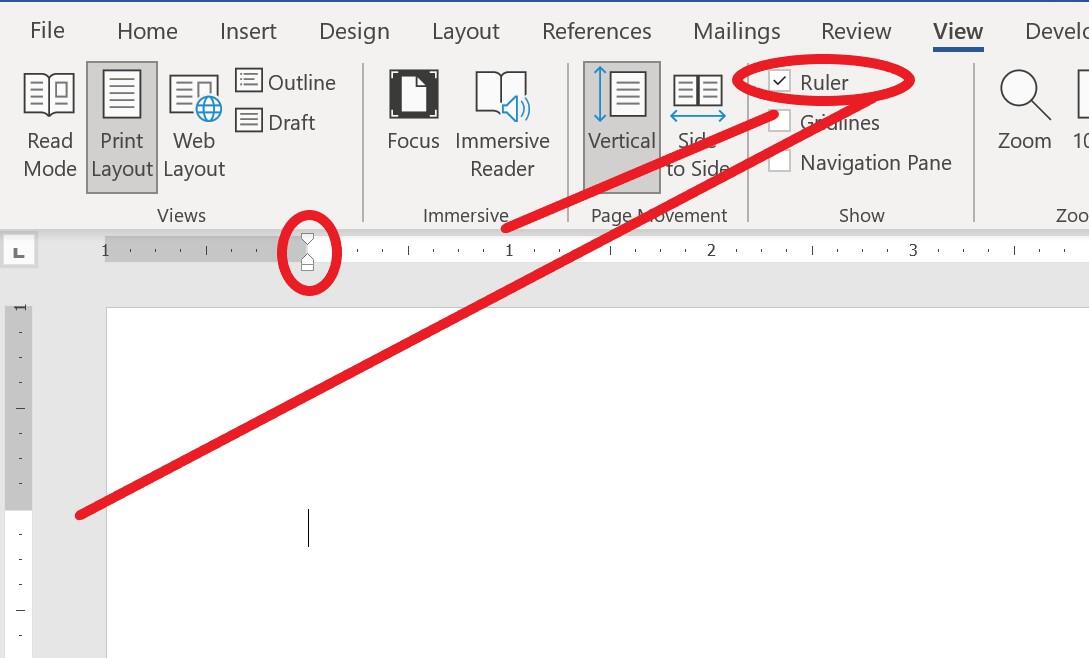
You already know what a space is, so we won't discuss those at length other than to mention that spaces don't necessarily equal a specific measurement on the ruler; the area each space requires depends on the font face and size. On the other hand, a tab, by default is set every half inch. If you don't see a ruler at the top of the screen (just under the ribbon) and one to the left of the screen, as shown in Figure A, click the View tab and then check Ruler in the Show group.
Figure A

Display the vertical and horizontal rulers.
To the left of the horizontal rule (the one at the top of the screen), notice the triangles and rectangle. The indent marker comprises these three elements. Each one means something specific to indents, which we'll cover more in depth later. Right now, the left margin is set to one inch from the left of the paper. Technically, you could think of a margin as an indent, but Word doesn't treat it as such. There are no indents set right now.
Instead of entering a few spaces, you might press the Tab key, which will move the cursor to the first Tab stop, which is one-half inch in from the left margin. However, doing so doesn't move the indent marker on the rule. Although you moved the cursor, Word doesn't think of this tab space as an indent. In addition, pressing Tab won't necessarily move you a full half inch. Tab stops are fixed.
SEE: Windows 10: Lists of vocal commands for speech recognition and dictation (free PDF) (TechRepublic)
For now, think of tabs as a shortcut for multiple spaces. The thing to remember is this: Regardless of whether you use spaces or tabs to indent text, both are influenced by paragraph marks, or hard returns—the result of pressing Enter at the right margin to wrap to the beginning of the next line. However, that influence may or may not be problematic.
The right way: built-in indents
Spaces and tabs, as easy as they are, will certainly cause trouble in a long document. I recommend using built-in indents instead. In the last section, I noted the indent marker (see Figure A). Spaces and tabs are not indents. Word indents as follows:
- The small rectangle at the bottom of the indention marker controls the Left indent. Click only the rectangle and drag it to any position to create a left indent—the space between the beginning of the line (paragraph) and the left margin. The entire marker will go with you if you've not already set other indents.
- The right indent is similar to the left, but the indicator is a small triangle at the right margin.
- Click the top triangle of the indent marker to create a first line indent, which determines where the first line of the paragraph begins. The remaining lines in the same paragraph will wrap to the left margin.
- A hanging indent determines the position of the wrapped lines after the first line. You'll use this a lot with bullet or numbered lists. Click the bottom triangle to set this type of indent.
Figure B shows the different indent markers. You can use these markers to set one-time indents. If you set one and start entering data, Word will use that indent until you change it. You can also select a paragraph or many paragraphs and apply the indent to only the selected paragraphs. Using built-in indents is the only way to ensure that random tabs and spaces used to create indents don't show up in unexpected places, throwing everything following out of kilter.
Figure B

Use these four markers to set indents.
When working with longer documents, even the built-in indents might be inadequate. In a future article, I'll show you how to add indents to styles.

Microsoft Weekly Newsletter
Be your company's Microsoft insider by reading these Windows and Office tips, tricks, and cheat sheets. Delivered Mondays and Wednesdays
Sign up todayAlso see
- How to make fewer mistakes and work more efficiently using predictive text in Microsoft 365 (TechRepublic)
- How to use the many text wrapping options in Microsoft Word (TechRepublic)
- Microsoft 365: A cheat sheet (TechRepublic)
- Zoom vs. Microsoft Teams, Google Meet, Cisco WebEx and Skype: Choosing the right video-conferencing apps for you (free PDF) (TechRepublic)
- Checklist: Securing Windows 10 systems (TechRepublic Premium)
- Everything you need to know about the Microsoft Exchange Server hack (ZDNet)
- Must-read coverage: Windows 10 (TechRepublic on Flipboard)


 English (US) ·